Delta Bathroom sinks, and accessories are commonly used as it provides sink faucets and sells them widely in North America.
They provide a separate stopper with the kit to place over the drain holes to control water flow.
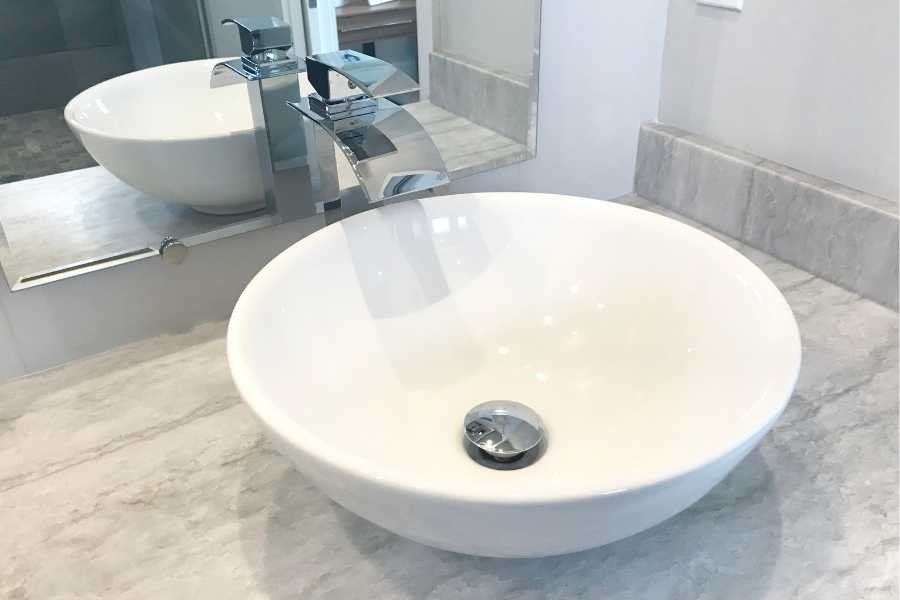
How to Remove Stopper from Delta Bathroom Sink? You can remove the stopper from the Delta bathroom sink by disengaging the drainage assembly and connecting it with the lever behind the faucet. This lifting rod connects with the pivot rod and retention hook and reaches the stopper from the drainage tailpiece. Next, move the spring clips and remove the clevis strap. Finally, detach the pivot rod by removing its contact with the retaining hook and pull out the stopper.
A single stopper for sinks can cost you around $12 to $20. Furthermore, manual replacement of this lid can help save the labor cost from $30 to $55.
Why is it essential to add a stopper to the Delta bathroom sink?
A stopper in the bathroom sinks prevents the quick flow of water and allows it to move smoothly inside the drainage pipe.
Some overflow holes are present, but they cannot stop water from overflowing in the long run; they can only delay it.
It allows smooth water to run from the overflow outlets if a faucet remains open accidentally. Moreover, it improves the drainage system by minimizing airflow with water inside the channel.
It fills up the basin surface and prevents air entry by covering the opening completely. A suction effect creates the drainage opening and allows water to move down slowly.
How do you remove the stopper from the Delta bathroom sink?
Some stoppers are easy to remove by picking them up from the bathroom sink. However, few of them have a fixed attachment to the drainage assembly and connect to the faucet indirectly.
So, you have to follow these steps to remove the pop-up units after disengaging them from the whole assembly.
Turn off the water supply
Turning off the faucet and disengaging the water supply is essential because running water can interfere with the removal process.
Moreover, keeping a basket under the sink is better because water leakage can occur when dealing with the drainage assembly.
These preventive measures can help avoid inconvenient circumstances like water overflow resulting in water everywhere on the floor.
Remove the clevis strap
Take on a headlamp for better visibility of the assembly under the sink.
You have to remove the spring clip before detaching the clevis strap because it connects the strap with the pivot rod.
Moreover, loosen the clip and remove it accordingly. So, you can take off the clevis strap when there is no clip to keep it bound in the assembly.
Detach pivot rod
Keep the strap hanging at its position and begin to twist the gasket in a clockwise direction with a screwdriver. This gasket is attaching the pivot with the drainage hole.
You can see a small white seal that looks like a ball that maintains water inside the drainage system and avoids leakage on the floor.
You can fix a clogged pivot at this time and replace it with a new one if you want to get rid of a dirty pivot.
It is better to get a compatible pivot that suits the gasket and matches the ball size.
However, you can clean the rod when there is no plan to replace it.
Pull out a drain stopper
It is easy to pull it out after removing the retaining hook. You can pull it with the help of a sucker by placing it on the cap.
However, you can also use a small rod or any other lifter to life it up; otherwise, use your hands to remove it.
Twist it at an angle of 90 degrees and then try to lift it when it is not coming out by simple pulling efforts.
The twisting method helps disengage the tabs present on its surface from the drain holes.
Place a new drain stopper
There is an option to change only the bottom portion by unscrewing its cap with pliers or screwdrivers. However, you can add a new lid over the drain holes also.
It is better to replace an old one with a completely new one when there is cracking in the bottom region and rusting on the cap.
Fix assembly properly
Try to fix the assembly properly, put the small rod present under the tailpiece of the drainage assembly into the hook, and screw it again.
It helps maintain a firm grip over the stopper and ultimately connects it with the pivot and lever.
Furthermore, twist the gasket properly to avoid leakage problems. Finally, fix the clevis strap correctly not to fall off the pivot.
How does a stopper work in the Delta bathroom sink?
You can operate it with the help of a lever or lift rod present behind the faucet by pulling it upward or pushing it downward.
This lever does not directly connect with the stopper, but there is a complete drainage assembly.
The lift rod connects with the pivot rod present horizontally under the sink. It connects by a Clevis, which is a flat slotted bar.
Furthermore, it reaches the bottom side of the stopper after passing through a hook present close to the drainage tailpiece.
It gets close when you pull the lever as it pulls the lever upward.
However, the closing lid creates a space over the drainage pipe when you push the lever down.
Its movement and the lever is opposite as it goes in an upward direction when you push the lift rod downward.
Therefore, a pivot rod creates a connection between the two and operates according to the actions on the rod.
Why would you remove the stopper from the Delta bathroom sink?
You can remove the lid to manage the water flow inside the sink hole when it gets damaged due to cracks or becomes rusty. Some other reasons include its breakage, poor leverage, and draining.
Broken pop-up assembly
You have to change the drainage system’s complete assembly when it breaks, including the stopper. For example, a pivot rod can split into two parts.
You can also observe small cracks or cuts in its bottom when something sharp enters inside the drainage hole.
Installation of a new faucet
Delta provides better faucet kits with a compatible product, so you have to change it when you want to replace the faucet.
Moreover, it is also essential to remove this barrier to water flow when you want to change the delta bathroom sink.
You have to disassemble the whole drainage assembly to shift into another place or install a new one.
Poor leverage
Some levers give poor leverage when you pull them in an upward direction.
It can occur when there is a problem in the pivot, and you have to apply great force to open or close it.
So, replace it with an intact one that can maintain enough leverage and delivers the signal from the rod to the pivot.
Rusting problems
Rusting is a common issue when there is moisture all around the surface.
The moisture can react with oxygen and result in rust formation on the metallic parts of the assembly.
These sinks are present in a wet place that remains moist most of the time, and the water flows inside them frequently.
Poor draining
The hair can get stuck inside the drainage holes after some years of usage, resulting in the poor working of the drainage system.
In addition, it can lead to clog formation inside and cause water overflow.
So, you can remove them to clean the whole assembly or only the pivot from the inner side.
These clogs interfere with the water flow and act as a barrier.
Moreover, use a long wire to disintegrate the clog to start water flow after separating each component.
Related Articles: